
k8s라고도 알려진 쿠버네티스는 컨테이너화된 애플리케이션을 자동으로 배포, 스케일링 및 관리해주는 오픈소스 시스템
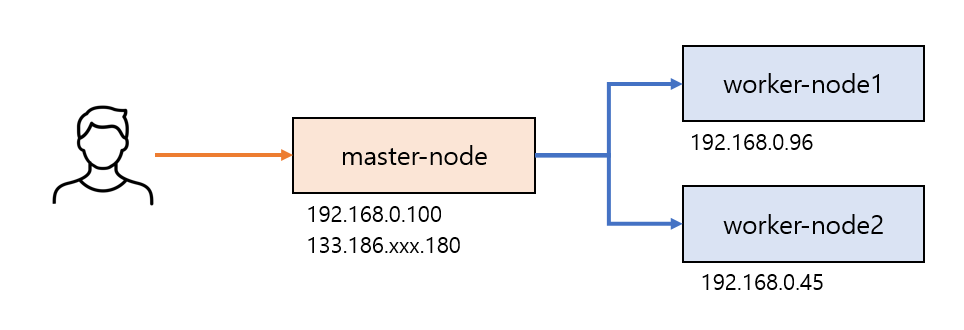
쿠버네티스 설치는 우분투 서버 3대로 구성한다.
- master-node
- worker-node1
- worker-node2
그리고 CNI(Container Network Interface) 표준을 지키는 네트워크 플러그인 Calico를 선택하여 구성을 한다.
Calico에 관련된 소개는 링크를 참고한다.
master-node
- OS: Ubuntu Server 20.04 LTS
- type: m2.c2m4 (2vCPU, 4GB)
- HDD: 60 GB
- IP : 192.168.0.100, 133.186.xxx.180
접속방법
ssh -i jdlee-key.pem ubuntu@133.186.xxx.180
서버 설정
#
# 서버이름변경
sudo hostnamectl set-hostname "master-node"

#
# hosts내용 수정
sudo vi /etc/hosts
192.168.0.100 master-node
192.168.0.96 worker-node1
192.168.0.45 worker-node2
install_kubernetes.sh 실행
아래 내용은 master-node, worker-node에서 동일하게 수행한다.
설치 스크립트는 Simplifying Kubernetes Installation on Ubuntu using a Bash Shell Script에 있는 내용을 참고하였다.
스크립트는 모든 서버에서 동일하게 실행하면 된다.
#
# 기본 설치 스크립트 수행
sudo -i
touch install_kubernetes.sh
vi install_kubernetes.sh

#
# ** install_kubernetes.sh 스크립트 내용 시작******
#!/bin/bash
# common.sh
# copy this script and run in all master and worker nodes
#i1) Switch to root user [ sudo -i]

#2) Disable swap & add kernel settings

swapoff -a
sed -i '/ swap / s/^\(.*\)$/#\1/g' /etc/fstab


#3) Add  kernel settings & Enable IP tables(CNI Prerequisites)

cat <<EOF | sudo tee /etc/modules-load.d/k8s.conf
overlay
br_netfilter
EOF

modprobe overlay
modprobe br_netfilter

cat <<EOF | sudo tee /etc/sysctl.d/k8s.conf
net.bridge.bridge-nf-call-iptables  = 1
net.bridge.bridge-nf-call-ip6tables = 1
net.ipv4.ip_forward                 = 1
EOF

sysctl --system

#4) Install containerd run time

#To install containerd, first install its dependencies.

apt-get update -y
apt-get install ca-certificates curl gnupg lsb-release -y

#Note: We are not installing Docker Here.Since containerd.io package is part of docker apt repositories hence we added docker repository & it's key to download and install containerd.
# Add Docker’s official GPG key:
sudo mkdir -p /etc/apt/keyrings
curl -fsSL https://download.docker.com/linux/ubuntu/gpg | sudo gpg --dearmor -o /etc/apt/keyrings/docker.gpg

#Use follwing command to set up the repository:

echo \
  "deb [arch=$(dpkg --print-architecture) signed-by=/etc/apt/keyrings/docker.gpg] https://download.docker.com/linux/ubuntu \
  $(lsb_release -cs) stable" | sudo tee /etc/apt/sources.list.d/docker.list > /dev/null

# Install containerd

apt-get update -y
apt-get install containerd.io -y

# Generate default configuration file for containerd

#Note: Containerd uses a configuration file located in /etc/containerd/config.toml for specifying daemon level options.
#The default configuration can be generated via below command.

containerd config default > /etc/containerd/config.toml

# Run following command to update configure cgroup as systemd for contianerd.

sed -i 's/SystemdCgroup \= false/SystemdCgroup \= true/g' /etc/containerd/config.toml

# Restart and enable containerd service

systemctl restart containerd
systemctl enable containerd

#5) Installing kubeadm, kubelet and kubectl

# Update the apt package index and install packages needed to use the Kubernetes apt repository:

apt-get update
apt-get install -y apt-transport-https ca-certificates curl

# Download the Google Cloud public signing key:

curl -fsSL https://dl.k8s.io/apt/doc/apt-key.gpg | sudo gpg --dearmor -o /etc/apt/keyrings/kubernetes-archive-keyring.gpg

# Add the Kubernetes apt repository:

echo "deb [signed-by=/etc/apt/keyrings/kubernetes-archive-keyring.gpg] https://apt.kubernetes.io/ kubernetes-xenial main" | sudo tee /etc/apt/sources.list.d/kubernetes.list

# Update apt package index, install kubelet, kubeadm and kubectl, and pin their version:

apt-get update
apt-get install -y kubelet kubeadm kubectl

# apt-mark hold will prevent the package from being automatically upgraded or removed.

apt-mark hold kubelet kubeadm kubectl

# Enable and start kubelet service

systemctl daemon-reload
systemctl start kubelet
systemctl enable kubelet.service

#
# ** install_kubernetes.sh 스크립트 내용 끝 ******

#
# install_kubernetes.sh 실행
sh install_kubernetes.sh
kubeadm init 수행하기
- 해당 작업은
master-node에서 수행한다. worker-node에서 진행하지 않는다.
$ sudo kubeadm init --pod-network-cidr=192.168.0.0/16
- pod network cidr을
192.168.0.0/16` 으로 설정하는 이유는 calico cni 구축 시 사용하기 때문이다. - Calico 기반 구축 블로그 내용 중 참고
kubeadm init이 완료되면 아래와 같은 안내가 나간다.
Your Kubernetes control-plane has initialized successfully!

To start using your cluster, you need to run the following as a regular user:

  mkdir -p $HOME/.kube
  sudo cp -i /etc/kubernetes/admin.conf $HOME/.kube/config
  sudo chown $(id -u):$(id -g) $HOME/.kube/config

Alternatively, if you are the root user, you can run:

  export KUBECONFIG=/etc/kubernetes/admin.conf

You should now deploy a pod network to the cluster.
Run "kubectl apply -f [podnetwork].yaml" with one of the options listed at:
  https://kubernetes.io/docs/concepts/cluster-administration/addons/

Then you can join any number of worker nodes by running the following on each as root:

kubeadm join 192.168.0.100:6443 --token z73isr.n7zqe14dji5q8d07 \
        --discovery-token-ca-cert-hash sha256:1c6e52cac97939c3e62331894399703e6132b72617b0b405b53cc38f894f01ad
현재 상태가 root이라면 exit명령어로 빠져나와 아래와 같은 명령을 수행한다.
mkdir -p $HOME/.kube
sudo cp -i /etc/kubernetes/admin.conf $HOME/.kube/config
sudo chown $(id -u):$(id -g) $HOME/.kube/config
Calico 구성하기
- calico 설치는 공식 문서도 같이 참고한다. 링크
kubectl create -f https://raw.githubusercontent.com/projectcalico/calico/v3.26.4/manifests/tigera-operator.yaml
kubectl create -f https://raw.githubusercontent.com/projectcalico/calico/v3.26.4/manifests/custom-resources.yaml
- Tigera Calico operator 그리고 custom resource definitions을 설치한다.
- 모든 Pod의 상태가 Running이 될 때가지 대기 합니다.
watch kubectl get pods -n calico-system- 해당 화면을 빠져나가려면 control + c를 누르세요.
ubuntu@master-node:~$ kubectl get pod -A
NAMESPACE          NAME                                       READY   STATUS    RESTARTS   AGE
calico-apiserver   calico-apiserver-57444f46d6-bmbzq          1/1     Running   0          62s
calico-apiserver   calico-apiserver-57444f46d6-fml7f          1/1     Running   0          62s
calico-system      calico-kube-controllers-844f76d6c7-72g75   1/1     Running   0          2m5s
calico-system      calico-node-7nf28                          1/1     Running   0          2m5s
calico-system      calico-typha-66cd8b855f-4zg8v              1/1     Running   0          2m6s
calico-system      csi-node-driver-wkk6d                      2/2     Running   0          2m5s
kube-system        coredns-5dd5756b68-7qz94                   1/1     Running   0          4m19s
kube-system        coredns-5dd5756b68-bvqnw                   1/1     Running   0          4m19s
kube-system        etcd-master-node                           1/1     Running   1          4m31s
kube-system        kube-apiserver-master-node                 1/1     Running   1          4m32s
kube-system        kube-controller-manager-master-node        1/1     Running   0          4m31s
kube-system        kube-proxy-kljdn                           1/1     Running   0          4m19s
kube-system        kube-scheduler-master-node                 1/1     Running   1          4m31s
tigera-operator    tigera-operator-7f8cd97876-w9ghv           1/1     Running   0          2m19s

ubuntu@master-node:~$ kubectl get nodes
NAME          STATUS   ROLES           AGE     VERSION
master-node   Ready    control-plane   4m42s   v1.28.2
- 전체 Pod를 확인했을 때, 아래와 같이 나오면 된다.
- 노드 상태 역시 Ready인 것을 확인 할 수 있다.
- 이제는 worker-node를 mater-node에 조인 시켜본다.
worker-node1
- OS: Ubuntu Server 20.04 LTS
- type: m2.c2m4 (2vCPU, 4GB)
- HDD: 60 GB
- IP : 192.168.0.96
접속방법
ssh -i jdlee-key.pem ubuntu@192.168.0.96
- master-node에서 실행한다.
서버 설정
# 서버이름변경
sudo hostnamectl set-hostname "worker-node1"

# hosts내용 수정
sudo vi /etc/hosts
192.168.0.100 master-node
192.168.0.96 worker-node1
192.168.0.45 worker-node2
- worker-node에서는 install_kubernetes.sh 실행까지 수행하고 kubeadm init는 수행하지 않는다.
- master-node에서 kubeadm init를 수행했을 때 출력된 kubeadm join 메세지를 따로 복사하지 않았다면 아래와 같은 명령어를 수행한다.
# 마스터 조인 토큰 생성
kubeadm token create --print-join-command
- kubeadm join 메세지를 따로 복사했다며 아래와같다.
- 이것을 worker-node에서 실행한다.
kubeadm join 192.168.0.100:6443 --token z73isr.n7zqe14dji5q8d07 \
        --discovery-token-ca-cert-hash sha256:1c6e52cac97939c3e62331894399703e6132b72617b0b405b53cc38f894f01ad

# 또는 /etc/hosts 파일을 수정했기 때문에 아랫처럼 입력해도 된다.

sudo kubeadm join master-node:6443 --token z73isr.n7zqe14dji5q8d07 \
        --discovery-token-ca-cert-hash sha256:1c6e52cac97939c3e62331894399703e6132b72617b0b405b53cc38f894f01ad
실제로 아래화면처럼 진행된다.
$ sudo kubeadm join master-node:6443 --token z73isr.n7zqe14dji5q8d07 \
>         --discovery-token-ca-cert-hash sha256:1c6e52cac97939c3e62331894399703e6132b72617b0b405b53cc38f894f01ad
[preflight] Running pre-flight checks
[preflight] Reading configuration from the cluster...
[preflight] FYI: You can look at this config file with 'kubectl -n kube-system get cm kubeadm-config -o yaml'
[kubelet-start] Writing kubelet configuration to file "/var/lib/kubelet/config.yaml"
[kubelet-start] Writing kubelet environment file with flags to file "/var/lib/kubelet/kubeadm-flags.env"
[kubelet-start] Starting the kubelet
[kubelet-start] Waiting for the kubelet to perform the TLS Bootstrap...

This node has joined the cluster:
* Certificate signing request was sent to apiserver and a response was received.
* The Kubelet was informed of the new secure connection details.

Run 'kubectl get nodes' on the control-plane to see this node join the cluster.
master-node에서 아래 명령어를 실행하면 전체노드의 상태를 확인 할 수 있다.
ubuntu@master-node:~$ kubectl get nodes -o wide
NAME           STATUS   ROLES           AGE    VERSION   INTERNAL-IP     EXTERNAL-IP   OS-IMAGE             KERNEL-VERSION      CONTAINER-RUNTIME
master-node    Ready    control-plane   112m   v1.28.2   192.168.0.100   <none>        Ubuntu 20.04.6 LTS   5.4.0-165-generic   containerd://1.6.26
worker-node1   Ready    <none>          67s    v1.28.2   192.168.0.96    <none>        Ubuntu 20.04.6 LTS   5.4.0-165-generic   containerd://1.6.26
worker-node2 역시 worker-node1에서 진행했던 작업과 동일하게 설정한다.
kubeadm Reset
간혹, 설정이 망했다면 리셋을 통해 다시 작업을 초기화 할 수 있다.
sudo kubeadm reset
sudo systemctl restart kubelet
sudo reboot
트러블 슈팅
ubuntu@worker-node2:~$ sudo kubeadm join master-node:6443 --token z73isr.n7zqe14dji5q8d07 \
>         --discovery-token-ca-cert-hash sha256:1c6e52cac97939c3e62331894399703e6132b72617b0b405b53cc38f894f01ad
[preflight] Running pre-flight checks
error execution phase preflight: couldn't validate the identity of the API Server: could not find a JWS signature in the cluster-info ConfigMap for token ID "z73isr"
To see the stack trace of this error execute with --v=5 or higher
worker-node2를 나중에 join하려고 하니 오류가 발생하였다.
kubeadm join으로 클러스터에 노드 추가(worker)를 참고하여 worker-node2를 join하기 위해 작업을 하였다.
master-node에서 아래와 같이 토큰을 생성한다.
# 토큰 리스트
$ kubeadm token list

# 토큰 생성
$ kubeadm token create
sj8azl.qq377mqc9jq8pmki

# hash 값 조회
openssl x509 -pubkey -in /etc/kubernetes/pki/ca.crt | openssl rsa -pubin -outform der 2>/dev/null | openssl dgst -sha256 -hex | sed 's/^.* //'
1c6e52cac97939c3e62331894399703e6132b72617b0b405b53cc38f894f01ad
worker-node2에 접속하여 아래와 같이 입력한다.
# master-node에서 생성했던 토큰 정보와 bash 값을 입력한다.
$ sudo kubeadm join master-node:6443 --token sj8azl.qq377mqc9jq8pmki \
discovery-token->         --discovery-token-ca-cert-hash sha256:1c6e52cac97939c3e62331894399703e6132b72617b0b405b53cc38f894f01ad
[preflight] Running pre-flight checks
[preflight] Reading configuration from the cluster...
[preflight] FYI: You can look at this config file with 'kubectl -n kube-system get cm kubeadm-config -o yaml'
[kubelet-start] Writing kubelet configuration to file "/var/lib/kubelet/config.yaml"
[kubelet-start] Writing kubelet environment file with flags to file "/var/lib/kubelet/kubeadm-flags.env"
[kubelet-start] Starting the kubelet
[kubelet-start] Waiting for the kubelet to perform the TLS Bootstrap...

This node has joined the cluster:
* Certificate signing request was sent to apiserver and a response was received.
* The Kubelet was informed of the new secure connection details.

Run 'kubectl get nodes' on the control-plane to see this node join the cluster.

# master-node에서 노드의 상태를 확인한다.
$ kubectl get nodes -o wide
NAME           STATUS     ROLES           AGE   VERSION   INTERNAL-IP     EXTERNAL-IP   OS-IMAGE             KERNEL-VERSION      CONTAINER-RUNTIME
master-node    Ready      control-plane   9d    v1.28.2   192.168.0.100   <none>        Ubuntu 20.04.6 LTS   5.4.0-165-generic   containerd://1.6.26
worker-node1   Ready      <none>          8d    v1.28.2   192.168.0.96    <none>        Ubuntu 20.04.6 LTS   5.4.0-165-generic   containerd://1.6.26
worker-node2   NotReady   <none>          16s   v1.28.2   192.168.0.45    <none>        Ubuntu 20.04.6 LTS   5.4.0-165-generic   containerd://1.6.26

# 시간이 지나면 worker-node2의 STATUS가 NotReady -> Ready 으로 변경된 것을 확인 할 수 있다.
$ kubectl get nodes -o wide
NAME           STATUS   ROLES           AGE   VERSION   INTERNAL-IP     EXTERNAL-IP   OS-IMAGE             KERNEL-VERSION      CONTAINER-RUNTIME
master-node    Ready    control-plane   9d    v1.28.2   192.168.0.100   <none>        Ubuntu 20.04.6 LTS   5.4.0-165-generic   containerd://1.6.26
worker-node1   Ready    <none>          8d    v1.28.2   192.168.0.96    <none>        Ubuntu 20.04.6 LTS   5.4.0-165-generic   containerd://1.6.26
worker-node2   Ready    <none>          76s   v1.28.2   192.168.0.45    <none>        Ubuntu 20.04.6 LTS   5.4.0-165-generic   containerd://1.6.26